Print a Document
After you create your document, you may need to print it. Select the Print option on the File menu. Your document will appear on the right side of the window in the Print Preview area. You can use the arrows in the bottom left corner of the Print Preview area to scroll through the pages of your document. You can use the Zoom in the bottom right corner to zoom in or out on your document. Dragging the Zoom bar to the right makes your document larger; dragging the Zoom bar to the left makes you document smaller, and can enable you to see multiple pages at once.
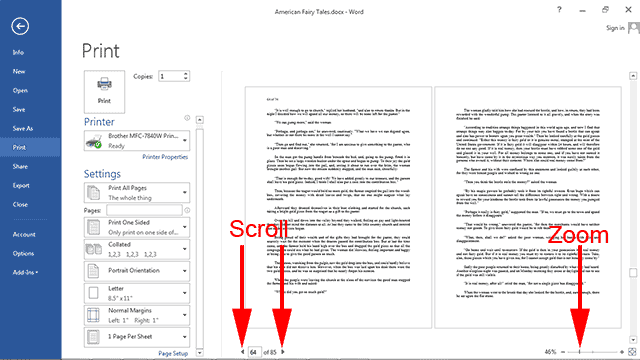
The following describes the print options:
Print: Make sure all of the print options are set the way you want them before you click the Print button. Click the print button to print your document.
Copies: If you want to print more than one copy, enter the number of copies you want in this field.
Printer Properties Link: The Printer Properties link appears below the Printer field. Click the link to open the Printer Document Properties dialog box for your printer. Consult the manual for your printer to learn how to set the options in this dialog box.
Settings: You can choose what to print and, if you choose to print pages, which pages you want to print. For example, instead of printing the document, you can choose to print a list of the styles used in the document, or you can choose to print only specific pages within the document.
Click the down-arrow next to Print All Pages to set the following options:
Print All Pages: This is the default. It prints every page in your document.
Print Selection: Prints the portions of your document that you selected.
Print Current Page: Prints the page shown in the print preview area.
Custom Print: Prints the pages you specify. Type the pages you want to print in the Pages field. To print individual pages, separate each page number with a comma. For example, to print pages 1, 3, and 10, type 1,3,10. To print a range of pages, separate the range with a hyphen. For example, to print pages 5 through 8, type 5-8. To print a page in a particular section, type p followed by the page number, then s followed by the section number. For example, to print page 2 of section 2, type p2s2; to print all pages between page 1 of section 1 and page 3 of section 3, type p1s1-p3s3. You can also combine individual pages and page ranges to make an entry such as 1, 3, 7-9, p3s4-p15s4.
Document Info: Print document properties such as the file name, directory, title, and author.
List of Markup: Print a list of the tracked changes in your document.
Styles: Print a list of the styles used in your document.
AutoText Entries: Print a list of the entries in your AutoText gallery.
Key Assignments: Print a list of your custom shortcut keys.
Print Markup: Print the document, showing all tracked changes and comments.
Only Print Odd Pages: Print odd numbered pages only. This is useful if you want to print on both sides of your paper, but your printer does not support two-sided printing. You can print odd pages, turn the paper over, and then print even pages.
Only Print Even Pages: Print even numbered pages only.
Sides: Click the down-arrow next to this field and choose whether you want to print on one side or both sides of the paper. If you want to print on both sides by manually turning the paper over, choose Manually Print on Both Sides. Print all the odd pages. Then turn the paper over and print all the even pages.
Collation: Click the down-arrow next to this field and choose whether you want your pages to be collated or uncollated. If you have chosen to print more than one copy of your document and you select Collated, Word will print page 1, 2, 3, and so on, then start again, printing as many copies as you have chosen with the pages in order. If you have chosen to print more than one copy and you select Uncollated, Word will print as many copies as you have chosen of the first page, then as many copies as you have chosen of the second page, and so on.
Orientation: Click the down-arrow next to this field and choose Portrait Orientation or Landscape Orientation. If you choose Portrait Orientation, the shortest edge of the paper will be the top of the page. If you choose Landscape Orientation, the longest edge of the paper will be the top of the page. To learn more about orientation, see the section Change the Page Orientation.
Page Size: Choose the size of the page. To learn more about page size, see the section Change the Page Size .
Define Margins: Choose the margin settings. To learn more about margins, see Set Margins.
Pages per Sheet: This option allows you to print multiple pages on a single sheet of paper. Choose the number of pages you want to print on each sheet.
Set Settings
Pages
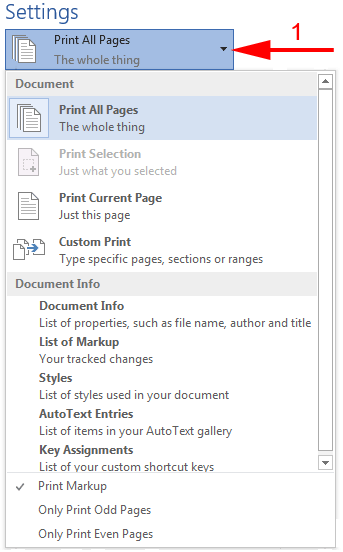
- Click the down-arrow next to the Pages field and then select the option you want.

- If you selected Custom Print, enter the pages you want to print in the Pages field.
Sides
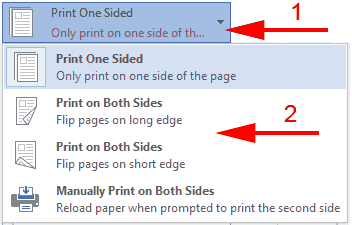
- Click the down-arrow next to the Sides field.
- Select whether you want to print on one or both sides of the paper.
Collate Copies
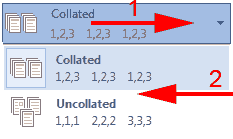
- Click the down-arrow next to the Collate Copies field.
- Select Collated or Uncollated.
Orientation
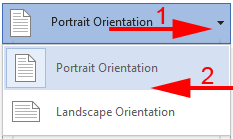
- Click the down-arrow next to the Page Orientation field.
- Select Portrait Orientation or Landscape Orientation.
See the section Change the Page Orientation to learn more about setting the orientation.
Page Size
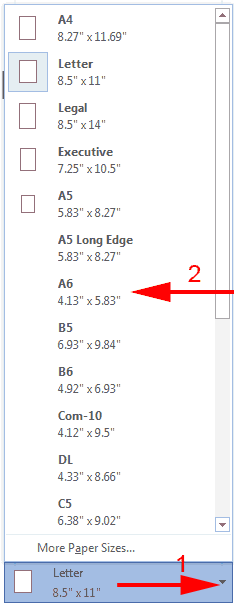
- Click the down-arrow next to the Page Size field.
- Select a page size.
See the section Change the Page Size to learn more about setting the page size .
Define Margins
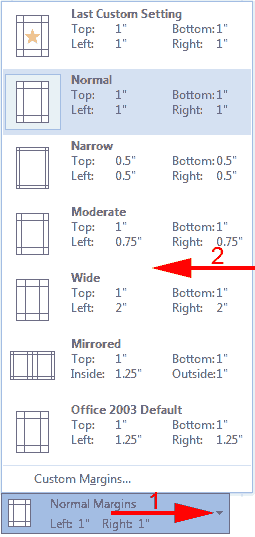
- Click the down-arrow next to the Defined Margins field.
- Select a margin setting.
See the section Set Margins to learn more about setting the margins.
Pages per Sheet
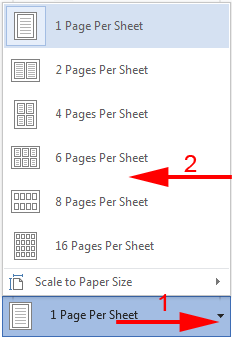
- Click the down-arrow next to Pages per Sheet.
- Select the number of pages you want to print on each sheet of paper.
Print Document
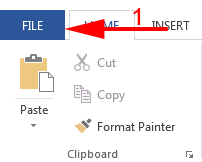
- Click the File tab. A menu appears along the left side of the window.
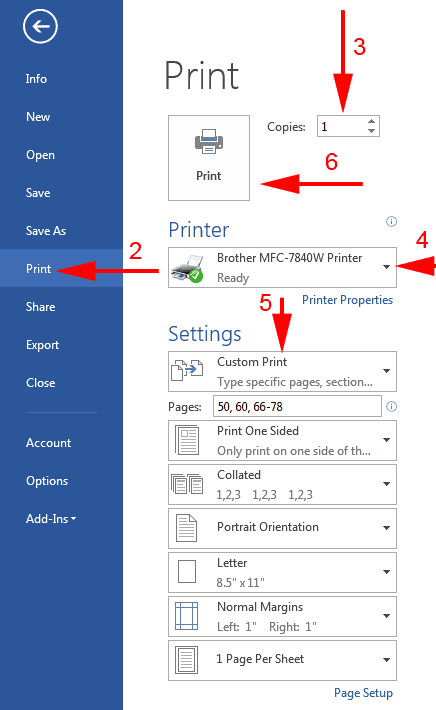
- Click Print. Word moves to the Print area.
- Type the number of copies you want to print in the Copies field.
- Click the down-arrow next to the Printer field and then click the printer option you want.
- Set Settings.
- Click the Print button. Word prints your document.
 Tip
Tip
You can create a document that prints two pages on a sheet in such a way that you can fold the paper in half and then open to read: 1) Choose the Page Layout tab. 2) Click the dialog box launcher in the Page Setup group. The Page Setup dialog box opens. 3) Click the down-arrow next to Multiple Page and then click 2 Pages per Sheet. When you select this option, Word automatically uses the landscape paper orientation. You may need to adjust your page width. For example, if you are printing two pages on a page, you may want to divide the page width in half.

Leave a Comment