Inkscape: Snapping
By using Inkscape's snapping option, you can place objects precisely where you want them. This is how snapping works. You select the desired icon; drag the object or mouse pointer close to the object you want to snap to; and Inkscape will flash an X and a message telling you what object will snap to what. When you release the mouse, the object will snap into position.
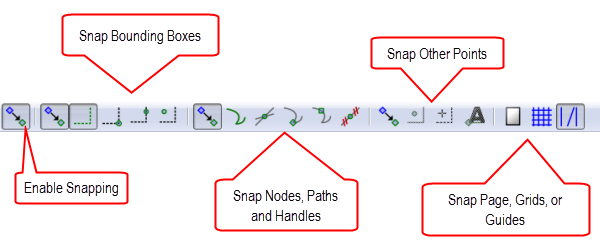
You find snapping options on the Snap Controls Bar. You set a view by clicking View on the menu bar and then selecting from Default, Custom, or Wide. This tutorial uses the Default view, which places the Snap Controls Bar along the right edge of the window. If your Snap Controls Bar does not display, click View > Show/Hide and then click Snap Controls Bar. If there is a check mark next to Snap Controls Bar, the bar is somewhere in your window. The View > Custom option places it in the top section of the window under the Command Bar. The View > Wide option places it along the right edge of the window beside the Command Bar. The Snap Controls bar has five sections: Enable Snapping; Snap Bounding Boxes; Snap Nodes, Paths, and Handles; Snap Other Points; and Snap Page, Grids, or Guides.
The Enable Snapping section has only one option – the Enable Snapping icon ![]() . This icon toggles the snapping feature on and off. If this icon is not on, you cannot perform any snapping task. There will be times when you do not want objects to snap. This icon will come in handy.
. This icon toggles the snapping feature on and off. If this icon is not on, you cannot perform any snapping task. There will be times when you do not want objects to snap. This icon will come in handy.
Every object has a bounding box. The bounding box is the dotted line that surrounds the object when you select it. You can use the Snap Bounding Boxes section to snap to various parts of the bounding box.
The Snap Nodes, Paths, and Handles section enables you to snap to cusps nodes, smooth nodes, and paths. You must activate the first icon, Snap Nodes, Paths, and Handles, before you can use any of the other options in this section. Therefore, to use this section, you must first toggle on the Enable Snapping icon and the Snap Nodes, Paths, and Handles icon. Both shapes and paths can be snap points and/or targets.
There are six icons in the Snap Nodes, Paths and Handles section. The following table explains each of them.
There are four icons in the Snap Other Points section. The following table explains each of them.
As its name implies, you can use the Snap Page, Grid, or Guides section to snap to the page, to grids, or to guides.
| Icon | Function |
| Snap to the Page Border |
Snaps to the page border. |
| Snap to Grids |
Snaps to grids. |
| Snap Guides |
Snaps to guides. |


Unfortunately, when trying to snap the bounding boxes of two groups, it doesn’t work. Instead, the one group only tries to snap to single shapes contained in the other group, but not to the other group’s bounding box.
This is on Inkscape 1.02