Excel: Change the Font
A font is a collection of characters that all have the same basic design. Fonts are used to print text to various output devices and to display text on screen. When you begin a new Excel workbook, you are using the default theme’s body font.
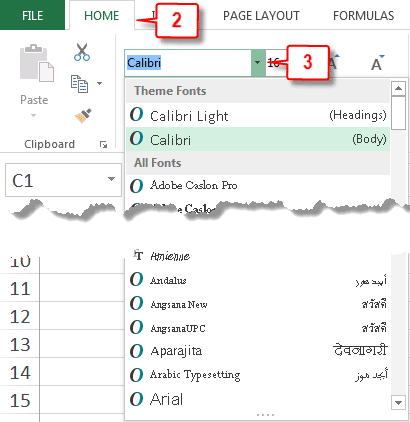
You can change the font by clicking the down-arrow next to the Font box. All of the available fonts appear in a gallery, which is divided into two groups: Theme Fonts and All Fonts.
Every workbook is associated with a theme. Every theme has a font set consisting of a headings and body font associated with it. As a general rule, a theme will use the headings font to format headings and the body font to format the body of your workbook. The Theme Fonts section lists the headings and body fonts used by your workbook's theme. If your goal is to change the default fonts used by your workbook, change the font set used by the theme.
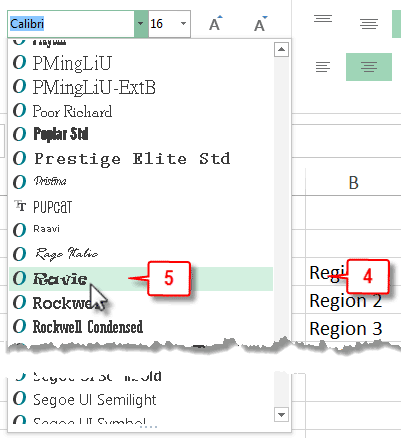
All Fonts displays a list of all the fonts on your computer and available to you. As you move your mouse pointer over fonts, Excel displays any text you have selected in that font. This is called live preview. To select a font, click the font name.
Change the Font

- Select the cells that have the font you want to change.

- Choose the Home tab.
- Click the down-arrow next to the Fonts box in the Font group. A gallery of fonts appears.

- Move the mouse pointer over the list of fonts. Excel provides a live preview.
- Click the font name for the font you want. Excel applies the font to the selected data.

 How do I change a theme's font?
When using Excel, unless you made changes, the headings and body fonts are the default theme's fonts. To change the theme's fonts: 1) Choose the Page Layout tab. 2) Click Fonts in the Themes group and then click to choose the font set you want from the gallery that appears.
Alternatively, you can create your own font set. 1) Choose the Page Layout tab. 2) Click Fonts in the Themes group. 3) Click Customize Fonts. The Create New Theme Fonts dialog box opens. 4) Click the down-arrow next to the Heading font field and then select a heading font. 5) Click the down-arrow next to the Body Font field and then select a body font. 6) In the Name field, type the name you want to give your font set. 7) Click Save. Excel creates your font set. Hence forth, when you click the Fonts button, your font set will appear in the Custom section.

Leave a Comment