Inkscape: Work with Layers
An Inkscape image can consist of many layers. Every image has at least one layer and by default, Inkscape names it Layer 1. Think of layers as a stack of transparent sheets. You can see through each layer to the layers under it until you add opaque color.
You can add layers, delete layers, and change the position of layers. Each layer is independent of all other layers. The layer you are currently working on is called the current layer. You can use the Layer menu or the Layers dialog box to work with layers.
You might be asking, why use layers? Layers enable you to divide your document into manageable groups. Any layer can be visible or not visible. You cannot see the objects that are on a layer that is not visible. Any layer can be locked or unlocked. You cannot make changes to a locked layer.
Open the Layers Dialog Box

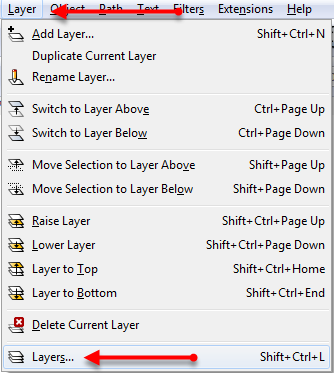
- Click Layer > Layers or press Shift + Ctrl + L. The Layers dialog box opens.
Create a Layer
The Add Layer option enables you to add a new layer.
- Click Layer > Add Layer. The Add Layer dialog box opens.
- Type the name you want to give the layer in the Name field.
- Click the down-arrow next to the Position field and select where you want to place the new layer.
- Click Add. Inkscape creates and names a new layer.
Lock/Unlock a Layer
The Lock/Unlock layer option toggles between locking and unlocking a layer.
- Click Layer > Lock/Unlock Current Layer. Inkscape locks the layer if it is unlocked; unlocks the layer if it is locked.
Rename a Layer
The Rename layer option enables you to change the name of a layer.
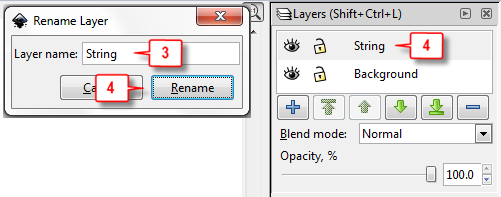
- In the Layers dialog box, click the layer you want to rename.
- Click Layer > Rename Layer. The Rename Layer dialog box opens.
- Type a new name.
- Click Rename. Inkscape renames the layer.
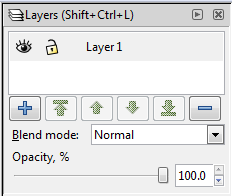
The Layers Dialog Box
When working with layers, you can also use the icons found in the Layers dialog box.


Lucie, female, 80 and learning Inkscap, 1.0.2-2 (e86c870879, 2021-01-15). Is this the correct version for this tutorial?
No, but you should be able to follow along. I will be updating shortly.
So how do you make one colour transparent in a layer with a bitmap in it?
I am not sure what you are asking. But, in general, you would select the object or objects you want to make transparent and change their transparency. You would NOT change the transparency of the layer itself.
To change the transparency of objects:
1) Select the objects.
2) On the menu, click Object > Fill and Stroke. The Fill and Stroke dialog box opens.
3) At the bottom of the dialog box you will find an Opacity Slider. Adjust the slider to the opacity you want.
How do I split multiple upper layers and and their sublayers in to different drawings with each upper layer and its sublayers into different files?
I am not really understanding your question. If you truly want different .svg files, use the Inkscape Save As option and delete the unnecessary layers in the new files. If you want to export files with only specific layers displaying, hide the layers you don’t want to display before your export.