Inkscape: Patterns
A pattern is a design. Inkscape comes with several very simple patterns (dots, stripes, checkerboard, etc.) and you can create your own. In fact, anything you draw can become a pattern. Inkscape takes what you have drawn and creates a grid. You can use patterns as a stroke, or a fill, and you can move, rotate, and scale patterns.
When you create a pattern, Inkscape names it "pattern" followed by a number. You can, and perhaps should, change the name. I will show you how. However, it is not as straight forward as it should be and you have to be careful you get it right because you are actually modifying the code used to create your Inkscape image. Also, the name you give must not include spaces.
Apply an Existing Pattern
- Select an object.
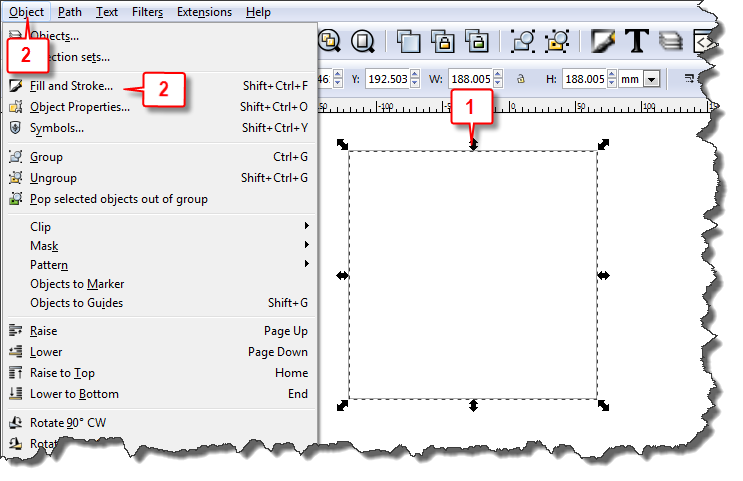
- Click Object > Fill and Stroke or press Shift + Ctrl + F. The Fill and Stroke dialog box opens.
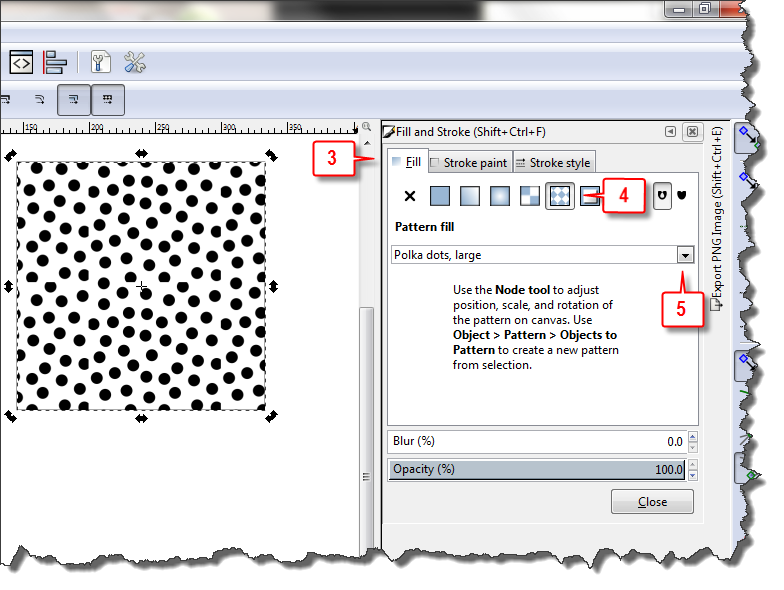
- Click the Fill tab if you want to apply a pattern to a fill. Click the Stroke Paint tab, if you want to apply a pattern to a stroke.
- Click the Pattern icon. The Pattern Fill field appears.
- Click the down-arrow next to the Pattern Fill field and then select the fill you want. Inkscape fills the stroke or fill with the pattern you selected.
Create a Pattern
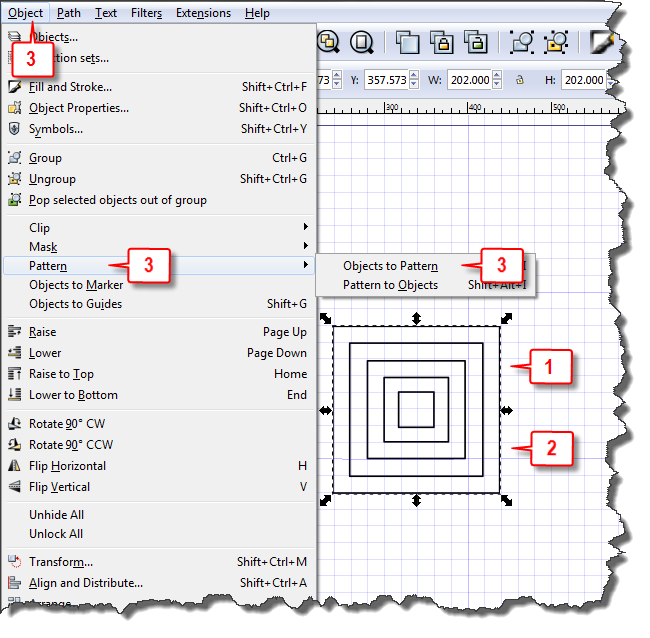
- Draw your pattern.
- Select your pattern
- Click Object > Pattern > Objects to Pattern or press Alt + I. Inkscape creates your pattern.
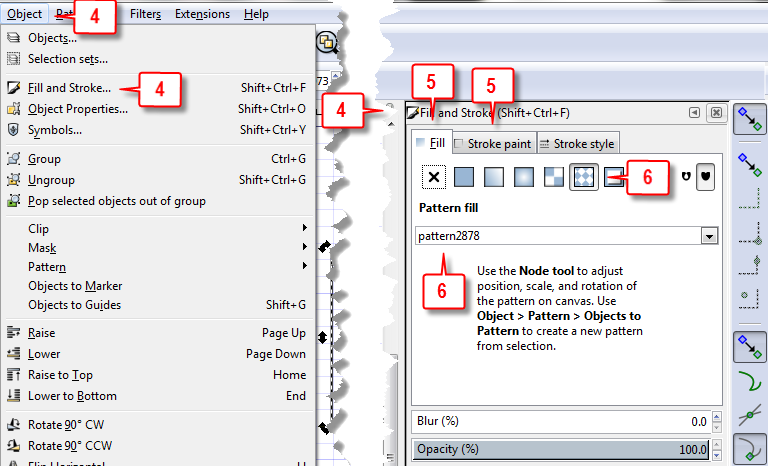
- Click Object > Fill and Stroke or Press Shift + Ctrl + F. The Fill and Stroke Dialog box opens.
- Choose either the Fill or the Stroke Paint tab.
- Click the Pattern icon. The name of your pattern appears in the pattern list. You may want to rename the pattern. If so, make a note of the name Inkscape gave it.
Name a Pattern
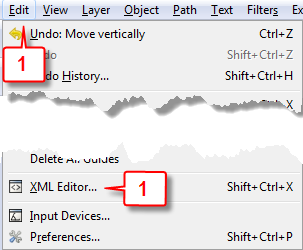
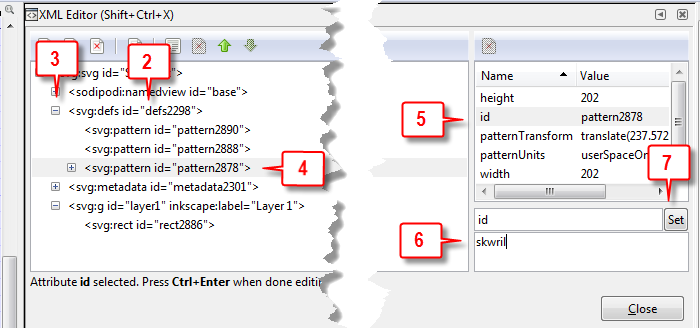
- Click Edit > XML Editor or press Shift + Ctrl + X. The XML Editor opens.
- In the box on the left, look for the section that starts with <svg:defs id = …
- Click to expand that area.
- Locate and click the name Inkscape gave your pattern.
- In the box on the right, click Id. The word Id will appear next to the Set button.
- In the box below the Set button, type the new name. Do not include any spaces. Do not move to a new line after you type the name.
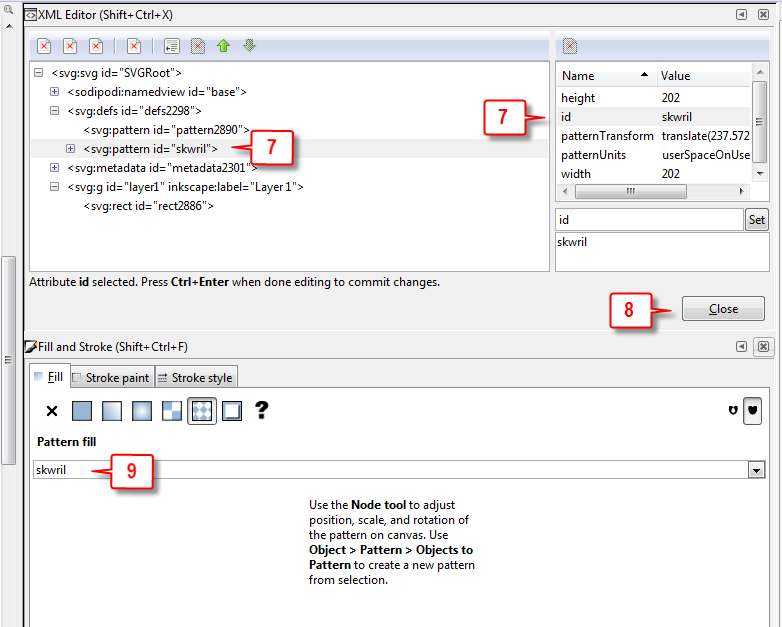
- Click the Set button. Inkscape renames your pattern.
- Click Close. Inkscape closes the XML Editor.
- Open the Fill and Stroke dialog box. Your pattern will be listed as a pattern with the name you gave it.
Move, Rotate, or Scale a Pattern
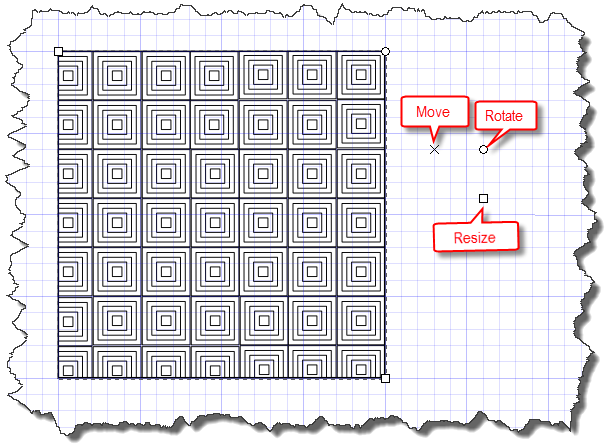
After you change a fill or stroke to a pattern, you can use the pattern controls to move, rotate, or scale the pattern. You invoke the pattern controls by pressing the Nodes tool. Inkscape may have placed the pattern controls anywhere in your document. You may have to look for them.
| Icon | Function |
| X | Move the pattern and/or change the location of the controls. |
| Square | Scale or resize the pattern |
| Circle | Rotate the pattern. |

I appreciate the tutorial. I’m wondering, though, how to delete a pattern from the list of patterns I created as a fill, now that I no longer want it . . . ? I feel like there should be an obvious way, but I’m a newbie, so it escapes me. . .
To remove a pattern it must no longer be in use:
1) remove all uses of the pattern
2) remove the object used to create the pattern
3) menu file>clean up document
I’m using Inkscape 1.1 and have concluded that that the new version doesn’t have a Set Button. Here are the steps which seem to work for me. Won’t mean much unless you have access to the useful tutorial above. Thanks, Sharlie.
To Rename
May want to hit “1” to set a workable page size before beginning.
Make or select Object,
Object>Pattern>Object to Pattern
Fill/Stroke dialog to get Pattern name
Edit > XML Editor
Click triangle to expand
Click pattern name
Find either to the right (or below) “id pattern ” Click on “id” then Enter to select “pattern ”
Re-name pattern with no spaces, don’t change lines, don’t hit Enter. Click “id” again
Original pattern disappears from Canvas
Choose an object to fill, Fill/Stroke dialog to choose new pattern
Renamed patter appears in drop down menu.
Same problem, control arms don’t show.
thanks for this tutorial. Simple thing, but hard to solve in practice 🙂
Excellent tutorial!! Thank you!! :))
+1 Really liked this tutorial
Listen to what you are saying : the pattern controls MAY be SOMEWHERE in the document, you have to zoom out to infinity to find them, and then you can’t see to adjust the pattern to the object. So, it is ‘okay’ that the idiotic handles randomly appear in infinity INSTEAD OF RIGHT AT THE PATTERN ? ? ? insanity.
@ Dean
The handles are probably there but they’re appearing far away from the object you’re trying to edit, which makes it seem like nothing is happening when you click the node tool. Zoom out as far as possible and look around before you do anything else, the handles are likely somewhere else on the canvas. You can move the handles closer to where they should be by clicking on the crosshairs and dragging them.
While I agree this should NOT be the case, it unfortunately is.
Question: I created a custom pattern, no problem. And I applied it to a closed path, still no problem. But when I click on the Node tool, the pattern controls do not appear. As a test, I drew a square using the Square/Rectangle tool, applied my custom pattern, and clicked the Node tool, but the pattern controls did not appear. However, when I changed the square’s pattern to a predefined stripes pattern (Stripes 1:1) and clicked the Node tool, the pattern controls DID appear.
Evidently, the pattern controls are not available for custom patterns. Is this true? But, no, you show pattern controls for the custom pattern in this tutorial. However, I tried to duplicate your custom pattern of squares, but again I was unable to get the Node tool to show the pattern controls. Any hint about what’s going on? Is it something about the object that I converted to a pattern?
(BTW: Thanks so much for this tutorial.)
Thanks for the help with patterns!
Hello a second time! I perused your instructions a dozen times, looking for a clue I may have missed. No success. I have made half a dozen patterns, but all come up with a blank picture after SET. I mean, after id and SET, all pattern names do appear in the pattern list and in Fill & Stroke, that’s all. But all attempts produce a blank where a graphic is expected, I mean all patterns I made with an existing image (such as palm.svg) as welll as the ones I have drawn. What advice can you give me?
Here are a few things you should be careful of:
Your name CANNOT include spaces.
Do not press Enter after you enter the name.
Thanks!
very clear instructions, thank you!
Hello! I don’t have a comment but a query: when getting to the very last instruction, your number 8, the click on SET or the CTRL ENTER produce no results. Is something missing?
–Guillaume Gardinal
After you press Set, look at the name next to Id. It should now be the name you gave your pattern. Click Close. Press Shift+Ctrl+F. The Fill and Stroke dialog box opens. Choose either the Fill or the Stroke Paint tab. Click the Pattern icon (number 4 in the second image). The name you gave your pattern will appear in the pattern list (number 5 in the second image).