Insert and Delete Page Breaks
As I discussed in Lesson 1, you can display a document in five different views: Read Mode, Print Layout, Web Layout, Outline, and Draft. In Print Layout view, you see your document as it will appear when you print it; you can clearly see where each page ends and a new page begins.
As you review your document, you may find that you want to change where a new page begins. For example, you may want every chapter to start on a new page. You can insert a page break. Later, if you change your mind, you can remove the page break.
Insert a Page Break

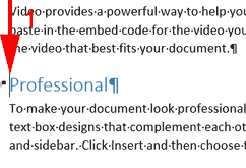
- Place the insertion point where you want your page break.

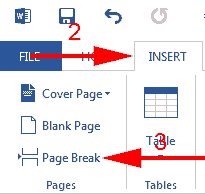
- Choose the Insert tab.
- Click Page Break in the Pages group. Word inserts your page break.
Delete a Page Break

- Place the insertion point immediately before the page break you want to delete.
- Press the Delete key. Word removes your page break.
 Tip
Tip
You can also use the Page Layout tab to insert a page break: 1) Place the insertion point where you want your page break. 2) Choose the Page Layout tab. 3) Click the down-arrow next to the Breaks command in the Page Setup group. A menu appears. 4) Click Page. Word inserts your page break.
| Shortcut Keys | |
|---|---|
| Description | Shortcut Keys |
| Insert page break | Ctrl+Return |

Leave a Comment